

This is our last tutorial on our pie chart custom view series. In the past two parts we convered how to draw our pie chart and we added state feedback based on a click of a pie slice. As our final piece of the puzzle we are now going to cover how to add callback functions to this component.
The onDraw method and the UI thread
Before we get into coding we have to first dsiscuss how a view draws itself onto the screen. When we define a view in our android apps we should know how the drawing happens. For instance, what is our pie chart missing? How do we know what each slice is for because all we see is a pie with no value indications (our Key)? A reference key is really important to any graphs and charts you'll be creating. So our chart needs one too, but the question is how do we get which colors were used when the chart was made? How do we add onClick listeners? Etc etc.
It's worth noting that the drawing of the view happens outside of the main thread. This means that if we want to get which colors were used when drawing the pie chart we have to wait until a view has been drawn. So its obvious we need to define a callback method that will fire when the drawing is done. In this post we are going to define the following callback methods:
onDrawFinised(DataColorSet[] data)- to return the colors used once the drawing has been completedonSliceClick(DataColorSet slice)- a slice click callback
The approach here is to define an inner interface inside our view class and have our activity implement this interface. Why? Because just like when you extend a class, the new class that you define is of the type of its super class. Like our pie chart class, it extends View which means our PieChartView is a View. The same applies with an interface. Let's implement our onDrawFinished() method and see this example in action:
public class PieChartView extends View {
    ...
    ...
    //Our Callback interface
    public interface Callback {
        public void onDrawFinised(DataColorSet[] data);
        public void onSliceClick(DataColorSet data);
    }
}
As you can see, our interface is defined inside our view class and its marked public. Also this view uses a class called DataColorSet which is as follows:
package com.example.object;

public class DataColorSet {
    private String color;
    private float dataValue;

    public DataColorSet() {}

    public DataColorSet(String color, float dataValue) {
        this.dataValue = dataValue;
        this.color = color;
    }

    public void setColor(String color) {
        this.color = color;
    }

    public void setDataValue(float dataValue) {
        this.dataValue = dataValue;
    }

    public String getColor() {
        return this.color;
    }

    public float getDataValue() {
        return this.dataValue;
    }
}
Now we will add a new instance variable in PieChartView class of type Callback so that we can its methods inside our view class. This is our view class instance variables:
public class PieChartView extends View {
    private Paint slicePaint;
    private int[] sliceClrs = { Color.GREEN, Color.BLUE, Color.RED, Color.YELLOW };
    private RectF rectf; // Our box
    private float[] datapoints; // Our values

    private int alphaIndex = -1;
    private Bitmap canvasBitmap;

    //Our Callback object
    private Callback callback;
}
Now we will define a mutator method to initialize our callback object and then use the object inside our onDraw() method. The implementation is as follows:
@Override
protected void onDraw(Canvas canvas) {
    if (this.datapoints != null) {
        int startTop = 0;
        int startLeft = 0;
        int endBottom = getWidth();
        int endRight = endBottom; // To make this an equal square
        // Create the box

        rectf = new RectF(startLeft, startTop, endRight, endBottom); // Creating the box

        float[] scaledValues = scale(); // Get the scaled values
        float sliceStartPoint = 0;

        //Initialize colors used
        dataColorSet = new DataColorSet[scaledValues.length];

        for (int i = 0; i < scaledValues.length; i++) {
            slicePaint.setColor(sliceClrs[i]); //Remember to set the paint color first

            //Let's check the alphaIndex if it is greater than or equal to 0 first
            if(alphaIndex > -1 && alphaIndex == i) slicePaint.setAlpha(150); //Then slice at i was pressed
            else slicePaint.setAlpha(255);

            canvas.drawArc(rectf, sliceStartPoint, scaledValues[i], true, slicePaint); // Draw slice
            sliceStartPoint += scaledValues[i]; // Update starting point of the next slice

            //Add DataColorSet object to return after draw
            dataColorSet[i] = new DataColorSet(Integer.toHexString(sliceClrs[i]), datapoints[i]);
        }

        //Build and get what's drawn on the canvas as a bitmap
        buildDrawingCache(true);
        canvasBitmap = getDrawingCache(true);

        //After the drawing has been done use your Callback's onDrawFinished() method
        callback.onDrawFinised(dataColorSet);
    }
}

public void setCallback(Callback callback) {
    this.callback = callback; //To initialize the callback object on your activity
}
Now the important thing to notice about the code above is that we defined a method that will used in our activity to initialize our callback object (otherwise we will have a nullpointer excpetion) and that we called our onDrawFinished() callback function at the end of our onDraw() after all the drawing has been done. Lets see how all of this comes together. Take a look at our activity:
package com.example.piechartexample;
import com.example.customview.component.PieChartView;
import com.example.object.DataColorSet;
import android.os.Bundle;
import android.app.Activity;
public class MainActivity extends Activity implements PieChartView.Callback {
@Override
protected void onCreate(Bundle savedInstanceState) {
super.onCreate(savedInstanceState);
setContentView(R.layout.activity_main);
PieChartView pieChartView = (PieChartView) findViewById(R.id.pie_chart);
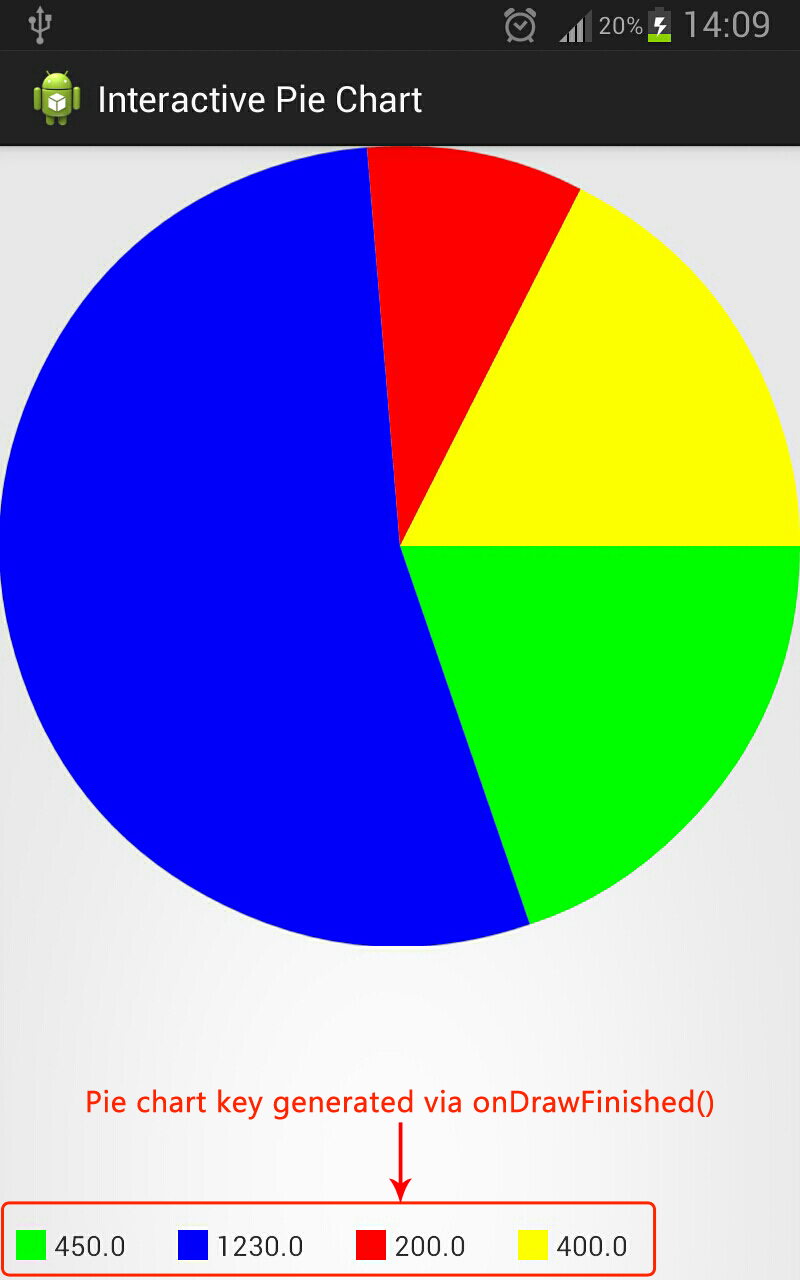
float[] datapoints = {450, 1230, 200, 400};
pieChartView.setDataPoints(datapoints);
//Because this activity is of the type PieChartView.Callback
pieChartView.setCallback(this);
}
@Override
public void onDrawFinised(DataColorSet[] data) {
//When the chart has finished drawing it will return the colors used and the value along (for our key)
LinearLayout keyContainer = (LinearLayout) findViewById(R.id.key);
if(keyContainer.getChildCount() > 0) keyContainer.removeAllViews(); //Empty all views if any found
for(int i = 0; i < data.length; i++) {
DataColorSet dataColorSet = data[i];
LinearLayout keyItem = (LinearLayout) LayoutInflater.from(this).inflate(R.layout.key_item, null);
LinearLayout colorView = (LinearLayout) keyItem.findViewById(R.id.color);
TextView valueView = (TextView) keyItem.findViewById(R.id.value);
colorView.setBackgroundColor(Color.parseColor("#" + dataColorSet.getColor()));
valueView.setText("" + dataColorSet.getDataValue());
//Add the key to the container
keyContainer.addView(keyItem, i);
}
}
@Override
public void onSliceClick(DataColorSet data) {
//When the slice has been clicked. You can decide to call another activity here. We'll just make a toast
Toast.makeText(this, "Value is: " + data.getDataValue(), Toast.LENGTH_LONG).show();
}
}
As you can see above, the method that initializes the callback object is called and we passed this as an argument. This is true since our activity implements the inner interface found on our PieChartView which means our activity is of type PieChartView.Callback. We then add LinearLayout items (key items) dynamically to a LinearLayout that's located at the bottom of the screen for our key. Our layout file has been modified and looks like this:
<?xml version="1.0" encoding="utf-8"?>
<RelativeLayout xmlns:android="http://schemas.android.com/apk/res/android"
    android:layout_width="match_parent"
    android:layout_height="match_parent"
    android:orientation="vertical" >

    <com.example.customview.component.PieChartView android:layout_width="match_parent"
        android:layout_height="400dp"
        android:id="@+id/pie_chart" />

    <LinearLayout android:layout_width="match_parent"
        android:layout_height="wrap_content"
        android:id="@+id/key"
        android:layout_alignParentBottom="true"></LinearLayout>
</RelativeLayout>
And this is how our key item XML layout looks like:
<?xml version="1.0" encoding="utf-8"?>
<LinearLayout xmlns:android="http://schemas.android.com/apk/res/android"
    android:layout_width="wrap_content"
    android:layout_height="match_parent"
    android:orientation="horizontal"
    android:gravity="center_vertical"
    android:padding="8dp" >

    <LinearLayout android:layout_width="15dp"
        android:layout_height="15dp"
        android:layout_marginRight="4dp"
        android:id="@+id/color"></LinearLayout>

    <TextView android:layout_width="wrap_content"
        android:layout_height="wrap_content"
        android:textIsSelectable="false"
        android:layout_marginRight="10dp"
        android:id="@+id/value" />

</LinearLayout>
Okay now that we've done our key list its time to define our onSliceClick(). We have to use it inside our view first on our setAlphaIndex() method (because that's where the slice is determined). This is how our setAlphaIndex() method looks like in our PieChartView class:
private void setAlphaIndex(String pixelHex) {
    for(int i = 0; i < sliceClrs.length; i++) {
        String tempHex = Integer.toHexString(sliceClrs[i]);
        if(pixelHex.equals(tempHex)) {
            alphaIndex = i; //This is the slice index to tweak the opacity of

            //Call our slice click here because the slice has been found
            callback.onSliceClick(dataColorSet[i]);

            break;
        }
    }
}
This is our last and final PieChartView class in this series:
package com.example.customview.component;

import android.content.Context;
import android.graphics.Bitmap;
import android.graphics.Canvas;
import android.graphics.Color;
import android.graphics.Paint;
import android.graphics.Paint.Style;
import android.graphics.RectF;
import android.util.AttributeSet;
import android.util.Log;
import android.view.MotionEvent;
import android.view.View;

import com.example.object.DataColorSet;

public class PieChartView extends View {
    private Paint slicePaint;
    private int[] sliceClrs = { Color.GREEN, Color.BLUE, Color.RED, Color.YELLOW };
    private RectF rectf; // Our box
    private float[] datapoints; // Our values

    private int alphaIndex = -1;
    private Bitmap canvasBitmap;

    //The data and color set object to be returned after the drawing is done
    private DataColorSet[] dataColorSet;

    //Our Callback object
    private Callback callback;

    public PieChartView(Context context, AttributeSet attrs) {
        super(context, attrs);
        slicePaint = new Paint();
        slicePaint.setAntiAlias(true);
        slicePaint.setDither(true);
        slicePaint.setStyle(Style.FILL);
    }

    @Override
    protected void onDraw(Canvas canvas) {
        if (this.datapoints != null) {
            int startTop = 0;
            int startLeft = 0;
            int endBottom = getWidth();
            int endRight = endBottom; // To make this an equal square
            // Create the box

            rectf = new RectF(startLeft, startTop, endRight, endBottom); // Creating the box

            float[] scaledValues = scale(); // Get the scaled values
            float sliceStartPoint = 0;

            //Initialize colors used
            dataColorSet = new DataColorSet[scaledValues.length];

            for (int i = 0; i < scaledValues.length; i++) {
                slicePaint.setColor(sliceClrs[i]); //Remember to set the paint color first

                //Let's check the alphaIndex if it is greater than or equal to 0 first
                if(alphaIndex > -1 && alphaIndex == i) slicePaint.setAlpha(150); //Then slice at i was pressed
                else slicePaint.setAlpha(255);

                canvas.drawArc(rectf, sliceStartPoint, scaledValues[i], true, slicePaint); // Draw slice
                sliceStartPoint += scaledValues[i]; // Update starting point of the next slice

                //Add DataColorSet object to return after draw
                dataColorSet[i] = new DataColorSet(Integer.toHexString(sliceClrs[i]), datapoints[i]);
            }

            //Build and get what's drawn on the canvas as a bitmap
            buildDrawingCache(true);
            canvasBitmap = getDrawingCache(true);

            //After the drawing has been done use your Callback's onDrawFinished() method
            callback.onDrawFinised(dataColorSet);
        }
    }

    public void setCallback(Callback callback) {
        this.callback = callback; //To initialize the callback object on your activity
    }

    @Override
    public boolean onTouchEvent(MotionEvent event) {
        //If the finger is on the screen
        if(event.getAction() == MotionEvent.ACTION_DOWN ) {
            //Get x and y coordinates of where the finger touched
            int pixelX = (int) (Math.floor(event.getX()));
            int pixelY = (int) (Math.floor(event.getY()));

            if(canvasBitmap != null) {
                //Get the pixel color
                int pixel = canvasBitmap.getPixel(pixelX, pixelY);

                //Convert the pixel into a hex color string
                String pixelHex = Integer.toHexString(pixel); //This will return a hexa-decimal of the bitmap

                //Set the alpha index so that we know which slice to change the opacity of
                setAlphaIndex(pixelHex);
            }

            invalidate();
        }

        //If the finger is off the screen
        if(event.getAction() == MotionEvent.ACTION_UP) {
            alphaIndex = -1; //This is a flag to reset the view alphas to normal
            invalidate();
        }

        return true;
    }

    public void setDataPoints(float[] datapoints) {
        this.datapoints = datapoints;
        invalidate(); // Tells the chart to redraw itself
    }

    private void setAlphaIndex(String pixelHex) {
        for(int i = 0; i < sliceClrs.length; i++) {
            String tempHex = Integer.toHexString(sliceClrs[i]);
            if(pixelHex.equals(tempHex)) {
                alphaIndex = i; //This is the slice index to tweak the opacity of

                //Call our slice click here because the slice has been found
                callback.onSliceClick(dataColorSet[i]);

                break;
            }
        }
    }

    private float[] scale() {
        float[] scaledValues = new float[this.datapoints.length];
        float total = getTotal(); // Total all values supplied to the chart
        for (int i = 0; i < this.datapoints.length; i++) {
            scaledValues[i] = (this.datapoints[i] / total) * 360; // Scale each value
        }
        return scaledValues;
    }

    private float getTotal() {
        float total = 0;
        for (float val : this.datapoints)
            total += val;
        return total;
    }

    //Our Callback interface
    public interface Callback {
        public void onDrawFinised(DataColorSet[] data);
        public void onSliceClick(DataColorSet data);
    }
}
The final result
....and we're done!
Yup that's it. Our custom pie chart view is done. We've drawn it, added callback functions and state to it which is basically what a control is. You are now free to playing around with some advanced transformations, shadow canvas features (to name a few) to make your chart look funky and hip!
Comments